
Wednesday, January 30, 2013
Tuesday, January 29, 2013

Wednesday, January 23, 2013
Tuesday, January 22, 2013

Saturday, January 12, 2013
Friday, January 11, 2013
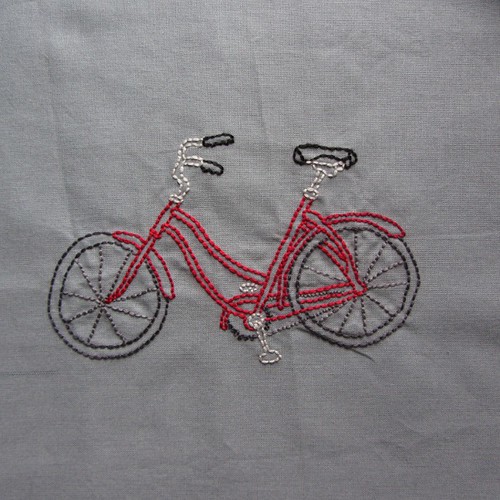
Bike
No 2: Bike
Pattern from Sublime Stitching, "Decemberists", on grey background
Here is the matching Decemberists song: Apology song
Pattern from Sublime Stitching, "Decemberists", on grey background
Here is the matching Decemberists song: Apology song
Insane embroidered quilt project
So. Since I have to finish my Phd this year I need a massive procrastination project, right?
I really love embroidery but I'm never quite sure what to do with the finished pieces. I often make embroidered gifts but in that case I make sure the motif fits the person who will get the present. But sometimes I find patterns that I like and that don't really fit anyone I would want make a present for. And I don't really want to hang up my finished embroidered work on the wall to show it off. I like it when people do that and it looks great, but I'm quite happy with the artwork currently on my walls.
So the solution? Just randomly embroider loads of squares with things I like or patterns I find and like. And then: sew them together in a quilt! Since I'm cold most of the time (ok, July/August daytime is generally fine) a cosy fleece-backed quilt to wrap up in would definitely be on display (on me) for most of the winter.
Then quilting part will be exciting since I've only done one quilting project so far. But it consisted of squares as well and they were less carefully cut than the one for this project so I'm optimistic. And, I have about a year until I need to think of that bit since there are 49 tiles to be embroidered! Hopefully I'll manage to do one a week.
This week there will be more to show off since I didn't post the ones from last week and I'm currently ill with a cold and have some time to kill with not too demanding activities. Writing does not fall in that category, so enough for now, I'll show you some pictures instead.
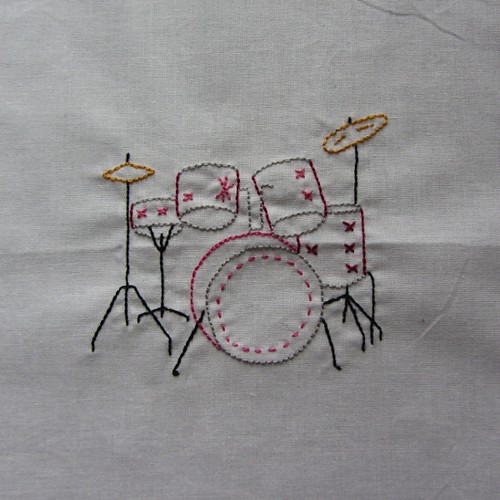
No 1: Drums
I really love embroidery but I'm never quite sure what to do with the finished pieces. I often make embroidered gifts but in that case I make sure the motif fits the person who will get the present. But sometimes I find patterns that I like and that don't really fit anyone I would want make a present for. And I don't really want to hang up my finished embroidered work on the wall to show it off. I like it when people do that and it looks great, but I'm quite happy with the artwork currently on my walls.
So the solution? Just randomly embroider loads of squares with things I like or patterns I find and like. And then: sew them together in a quilt! Since I'm cold most of the time (ok, July/August daytime is generally fine) a cosy fleece-backed quilt to wrap up in would definitely be on display (on me) for most of the winter.
Then quilting part will be exciting since I've only done one quilting project so far. But it consisted of squares as well and they were less carefully cut than the one for this project so I'm optimistic. And, I have about a year until I need to think of that bit since there are 49 tiles to be embroidered! Hopefully I'll manage to do one a week.
This week there will be more to show off since I didn't post the ones from last week and I'm currently ill with a cold and have some time to kill with not too demanding activities. Writing does not fall in that category, so enough for now, I'll show you some pictures instead.
No 1: Drums
Pattern from Sublime stitching, "Rock n Roll" on white
Christmas Vest
So, pattern is up again! It is the same pattern as before, still one size, random German wool and horrible formatting. But, if you're adventurous and just looking for inspiration, then I hope you enjoy it!
This is not an exact pattern but the notes I've taken during knitting. I've added a few comments so you have a chance to understand what they mean, but it will require a bit of thinking to knit the Christmas Vest. So if you've knitted a sweater or a vest before and (or) if you are adventurous this is for you. If not, read the instructions very carefully before you buy yarn (you should do that in any case) to see if you understand everything.
If you have questions you can contact me via craftster or ravelry (username: LizzieMcGuire).
Gauge:
20,5st x 33r 4inches
Yarn:
Schachenmayr nomotta Bravo 300g
for the fluffy border:
Wolle Rödel Formosa appr.20g
Needles:
3mm
5mm for faux-fur border
size S
Front:
CO 77Ma
work 1-1 rib over 24rows
now knit 31rows in stockinette stitch
now every following row will be worked in stockinette stich
/ Dec \
\ 7R / 2x
(17stitches)
7R (means: knit 7rows in stockinette without decreases and increases)
Inc (73) (increase-row)
1R
/ 2R \
\ Inc / 7x (75,77,79,81,83,85,87)
2R
/ 2R \
\ Dec / 2x (85,83)
1R
knit 38stitches, knit2tog
put middle stitch on safety pin
now we will work on the left side of neck-shaping.
Join yarn and knit the stitch after the middle stitch. Now SSK. Knit to end.
/ 3R \
\ dec / 3x (39,38,37) Decreases are worked only on the right side (always in knit rows) where the neckline is.
Bind of 6 stitches for the armhole and purl to end (31st)
neck and armhole shaping:
Work the right side of the neckline the same way. I know this requires a lot of thinking, but I don't have the time to write down a real pattern. Good thing is you get this for free, bad thing is you'll have to do a bit of the work yourself :-).
back:
CO 77st
24rows 1-1 rib
31R stockinette
Dec (75)
9R
Dec (73)
6R
Dec (71)
5R
Dec (69) start working the wings according to the chart in this row. This row is the row indicated by a red arrow in the chart.
A coloured cell means purl on RS, knit on WS an uncoloured means knit on RS, purl on WS
7R
Inc
1R
/ 2R \
\ Inc/ 5x (73,75,77,79,81)
15R
8R
bind of 6stitches
bind of 6stitches on the other side (69)
/ 1R \
\ Dec /15x (39) chart ends in the 10th iteration of this
2R
Dec (37)
/ 1R \
\ Dec / 3x (31)
/ 2R \
\ Dec / 3x (25)
Dec (23)
sleeves:
CO 56st
work 7rows in 2-2 rib
/ 1R \
| Dec |
| 2R |
\ Dec / 6x
/ 2R \
\ Dec/ 3x
10R
now we will do different decreases on the two edges:
on the left edge:
/ 1R \
| Dec | (only decrease one stitch by k2tog)
\ 1R / 3x
on the same time works these instructions on the right edge:
bind off 1 stitch
/1R \
\BO 3st / 4x
BO remaining 4 stitches
on the other sleeve work these decreases on the part where the decreases are different for each side:
left edge:
1R
BO 4st
/1R \
\BO 3st / 3x
1R
right edge:
/ 1R \
| Dec |
\ 1R / 3x
BO remaining 4 stitches
hood:
CO 8st
purl 1R
left piece of hood:
/ 1R \
\ Inc / 2x the increases are only worked on the right edge
Inc 8x (11,12,13,14,15,16,17,18)
Inc and CO 17st at the right edge
right piece of hood:
/ 1R \
\ Inc / 2x the increases are only worked on the left edge
Inc 9x (11,12,13,14,15,16,17,18,19)
CO 17st at the left edge
for both hood pieces:
8R
/ 4R \
\ Inc / 2x (38)
1R
/ 2R \
\ Inc / 3x (41)
/ 3R \
\ Inc / 2x (43)
2R
Inc (44)
6R
Inc (45)
5R
Dec (44)
5R
3R
Dec
5R
Dec (42)
2R
/ 1R \
\ Dec / 12x (30)
graft the two pieces together at the top
Finishing:
Sew pieces together.
With the fluffy yarn: pick up stitches along the neckline (appr. one stitch from two stitches because the fluffy yarn is thicker). Pick up a stitch from the middle stitch placed on the safety pin and on both sides of this stitch.
Now knit 3rows 1-1rib, working a decrease on both sides of the middle stitch in each row. BO, work the decreases in this row too!
Pick up stitches along the hood in the same way.
Knit 3rows 1-1 rib. BO.
Now sew together where the two pieces of knitted fur meet, so that it looks like knitted in one piece.
I guess you COULD knit it in one piece but I didn't have a circular needle of the right length so I did it in two pieces.
Abbreviations:
CO - cast on
BO - bind off
Dec - Decrease (I use SSK and k2tog)
Inc - Increase
Decreases and Increases are worked on both sides unless something different is said in the pattern. Work them two or at least one stitches away from the edge.
What means this?
/ 2R \
\ Inc/ 5x (73,75,77,79,81)
The pattern inside the brackets (here knit 2rows in stockinette without decreases and increases, then one row with increases) and repeat it as many times as stated (here 5 times). The numbers in the round brackets are the stitch numbers you should have after each of the iterations.
Chart:

This is not an exact pattern but the notes I've taken during knitting. I've added a few comments so you have a chance to understand what they mean, but it will require a bit of thinking to knit the Christmas Vest. So if you've knitted a sweater or a vest before and (or) if you are adventurous this is for you. If not, read the instructions very carefully before you buy yarn (you should do that in any case) to see if you understand everything.
If you have questions you can contact me via craftster or ravelry (username: LizzieMcGuire).
Gauge:
20,5st x 33r 4inches
Yarn:
Schachenmayr nomotta Bravo 300g
for the fluffy border:
Wolle Rödel Formosa appr.20g
Needles:
3mm
5mm for faux-fur border
size S
Front:
CO 77Ma
work 1-1 rib over 24rows
now knit 31rows in stockinette stitch
now every following row will be worked in stockinette stich
/ Dec \
\ 7R / 2x
(17stitches)
7R (means: knit 7rows in stockinette without decreases and increases)
Inc (73) (increase-row)
1R
/ 2R \
\ Inc / 7x (75,77,79,81,83,85,87)
2R
/ 2R \
\ Dec / 2x (85,83)
1R
knit 38stitches, knit2tog
put middle stitch on safety pin
now we will work on the left side of neck-shaping.
Join yarn and knit the stitch after the middle stitch. Now SSK. Knit to end.
/ 3R \
\ dec / 3x (39,38,37) Decreases are worked only on the right side (always in knit rows) where the neckline is.
Bind of 6 stitches for the armhole and purl to end (31st)
neck and armhole shaping:
| row | armhole | neckline | stitches at the end of this row |
|---|---|---|---|
| 1 | dec | dec | (29) |
| 2 | |||
| 3 | dec | dec | (27) |
| 4 | |||
| 5 | dec | dec | (25) |
| 6 | |||
| 7 | dec | dec | (23) |
| 8 | |||
| 9 | dec | (22) | |
| 10 | dec | (21) purl row | |
| 11 | |||
| 12 | |||
| 13 | dec | (20) knit row | |
| 14 | |||
| 15 | |||
| 16 | dec | dec | (18) |
| 17 | |||
| 18 | |||
| 19 | dec | (17) | |
| 20 | |||
| 21 | |||
| 22 | dec | dec | (15) |
| 23 | |||
| 24 | |||
| 25 | dec | (14) | |
| 26 | |||
| 27 | dec | dec | (12) |
| 28 | |||
| 29 | |||
| 30 | purl row | ||
| 31 | |||
| 32 | dec | ||
| 33 | dec | ||
| 34 | |||
| 35 | |||
| 36 | |||
| 37 | dec | ||
| 38 | |||
| 39 | dec | ||
| 40 | |||
| 41 | dec | ||
| 42 |
Work the right side of the neckline the same way. I know this requires a lot of thinking, but I don't have the time to write down a real pattern. Good thing is you get this for free, bad thing is you'll have to do a bit of the work yourself :-).
back:
CO 77st
24rows 1-1 rib
31R stockinette
Dec (75)
9R
Dec (73)
6R
Dec (71)
5R
Dec (69) start working the wings according to the chart in this row. This row is the row indicated by a red arrow in the chart.
A coloured cell means purl on RS, knit on WS an uncoloured means knit on RS, purl on WS
7R
Inc
1R
/ 2R \
\ Inc/ 5x (73,75,77,79,81)
15R
8R
bind of 6stitches
bind of 6stitches on the other side (69)
/ 1R \
\ Dec /15x (39) chart ends in the 10th iteration of this
2R
Dec (37)
/ 1R \
\ Dec / 3x (31)
/ 2R \
\ Dec / 3x (25)
Dec (23)
sleeves:
CO 56st
work 7rows in 2-2 rib
/ 1R \
| Dec |
| 2R |
\ Dec / 6x
/ 2R \
\ Dec/ 3x
10R
now we will do different decreases on the two edges:
on the left edge:
/ 1R \
| Dec | (only decrease one stitch by k2tog)
\ 1R / 3x
on the same time works these instructions on the right edge:
bind off 1 stitch
/1R \
\BO 3st / 4x
BO remaining 4 stitches
on the other sleeve work these decreases on the part where the decreases are different for each side:
left edge:
1R
BO 4st
/1R \
\BO 3st / 3x
1R
right edge:
/ 1R \
| Dec |
\ 1R / 3x
BO remaining 4 stitches
hood:
CO 8st
purl 1R
left piece of hood:
/ 1R \
\ Inc / 2x the increases are only worked on the right edge
Inc 8x (11,12,13,14,15,16,17,18)
Inc and CO 17st at the right edge
right piece of hood:
/ 1R \
\ Inc / 2x the increases are only worked on the left edge
Inc 9x (11,12,13,14,15,16,17,18,19)
CO 17st at the left edge
for both hood pieces:
8R
/ 4R \
\ Inc / 2x (38)
1R
/ 2R \
\ Inc / 3x (41)
/ 3R \
\ Inc / 2x (43)
2R
Inc (44)
6R
Inc (45)
5R
Dec (44)
5R
3R
Dec
5R
Dec (42)
2R
/ 1R \
\ Dec / 12x (30)
graft the two pieces together at the top
Finishing:
Sew pieces together.
With the fluffy yarn: pick up stitches along the neckline (appr. one stitch from two stitches because the fluffy yarn is thicker). Pick up a stitch from the middle stitch placed on the safety pin and on both sides of this stitch.
Now knit 3rows 1-1rib, working a decrease on both sides of the middle stitch in each row. BO, work the decreases in this row too!
Pick up stitches along the hood in the same way.
Knit 3rows 1-1 rib. BO.
Now sew together where the two pieces of knitted fur meet, so that it looks like knitted in one piece.
I guess you COULD knit it in one piece but I didn't have a circular needle of the right length so I did it in two pieces.
Abbreviations:
CO - cast on
BO - bind off
Dec - Decrease (I use SSK and k2tog)
Inc - Increase
Decreases and Increases are worked on both sides unless something different is said in the pattern. Work them two or at least one stitches away from the edge.
What means this?
/ 2R \
\ Inc/ 5x (73,75,77,79,81)
The pattern inside the brackets (here knit 2rows in stockinette without decreases and increases, then one row with increases) and repeat it as many times as stated (here 5 times). The numbers in the round brackets are the stitch numbers you should have after each of the iterations.
Chart:
Subscribe to:
Posts (Atom)