I have posted the original pattern here, but I don't like how I did the decreases on the hat, so if you're experienced enough you might want to change the way you do the decreases to make it look nicer. But since you are probably a math geek I assume you are not afraid of numbers and tinkering with patterns. :-)
Math geek hat pattern
Wolle Rödel Universal brownLana Grossa Numero Uno orange
Gauge: 22 stitches x 28 rows are 10cm
Needles:
3.5mm DPNs
CO 128 stitches.
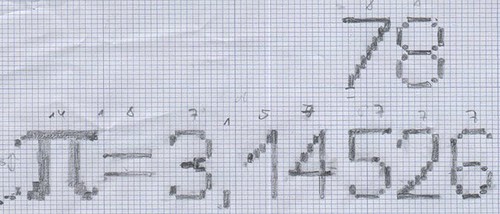
Work 10 rows in 2-2 rib. Now work 3 rows in stockinette stitch. (Warning: if you want a comma instead of a dot you have to knit the stitch in orange in the last of the three rows and in the row following! I suggest using the intarsia technique for those two stitches).
Now knit to the last 6 stitches. Here you have to join the new colour and knit the dots according to the chart. Now start knitting according to the chart (stranded knitting) for the next 15 rows. Remember to weave in the yarn carried in the back if it's carried for more than 7 stitches (just wrap the two strands of yarn around each other for this). And do the stranding loosely otherwise you won't be able to put the hat on you head.
Additions to the chart: The red lines mark the beginning of the next needle. This helps keeping track of the colourwork. The 10 on the left of the pi means that you have to knit until the end of the needle and then start again at first needle (with the 5).

After you've completed the colourwork: Knit 5 rows in stockinette stitch. Now start the decreases.
decrease row (you have to have the stitches distributed evenly over the four needles): Knit one stitch, SSK, knit to last two stitches on needle, k2tog (repeat this for the three remaining needles).
Decrease row (30 stitches on each needle)
row (without decreases)
Decr. row (28)
Decr. row (26)
row
row
Decr. row (24)
row
row
Decr. row (22
) row
row
Decr. row (20)
row
Decr. row (18)
row
Decr. row (16)
row
Decr. row (14)
row
Decr. row (12)
row
Decr. row (10)
Decr. row (8)
Decr. row (6)
Decr. row (4)
Now: knit one, insert needle into the next two stitches as if to k2tog and slip them to the right needle. Knit the next stitch and pass the slipped stitches over it. Repeat this for the other three needles.
Cut the yarn and pull it through the remaining 8 stitches with a needle.
And here is the number chart, if you have a bigger head you can fit a few additional digits to your head:
You may use this pattern for personal, non-commercial use. You are not allowed to copy or sell it without the authors permission.